In this guide, we will show you two different methods to create custom fingerprints/build.prop to pass the Play Integrity Test on your rooted device or if you are running a custom ROM. Well, it seems we might finally reach the end of the road, as far as gaining administrative privileges is concerned. For the unaware, if you root your device, then it will trip the SafetyNet Test, thereby making it difficult to use banking and payment apps.
However, we managed to find a workaround that helped us pass this test with ease. Fast forward to this year, Google introduced the Play Integrity Test and has instructed every app to incorporate its API by January 2025. At the time of writing, many banking and payment apps have already shifted over to this test.
As before, if your device is rooted, then you will fail this test, thereby resulting in your inability to use banking apps. Fortunately, we once again managed to get hold of a method to bypass this test. Google then took a step further and patched our tweak only for us to bypass it once more! Until now. The Silicon Valley giant has finally taken the most extreme step to date which might finally spell the end of root for the tech enthusiasts.
Google ‘Banning’ Fingerprints for Play Integrity: Is Hiding Root Impossible?
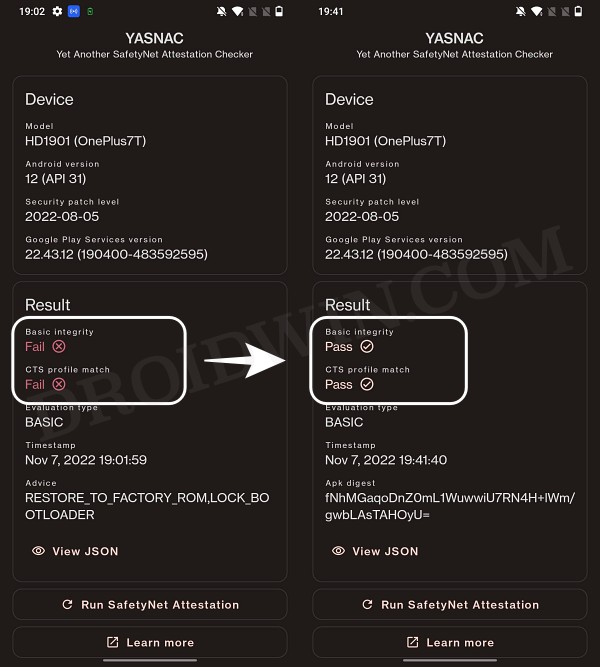
Up until now, we were able to use the XDA Senior Member Chiteroman’s module to easily pass the MEETS_DEVICE_INTEGRITY and MEETS_BASIC_INTEGRITY, which are two prerequisites of the Play Integrity test. In hindsight, the module uses a fingerprint from one of the unpatched devices and the developer then uploads his mod over to GitHub. Since this mod is open source, anyone can easily decode it, including Google! And that is exactly what is happening.
While it might sound hard to digest why would Google end up utilizing a part of its resources towards this project which affects only about 3% of Android users, but trust us, that’s exactly what’s currently going on. The developer has tried out numerous combinations of fingerprints in its modules, including different OEMs, different Android versions, and even different custom ROMs [such as Evolution X].
However, every time a new module is released, Google tends to patch it straightaway, thereby leaving the developer with three options- either keep on playing this trial-and-error method, make the module closed source, or list out the instructions on how a user could create a custom fingerprint file and use it to pass this test.
The first approach was neither the most feasible nor the most viable for him [because he wasn’t earning anything from it and more importantly he has a life out of this modding community too!]. Likewise, making it a closed source might have raised a few eyebrows from some of the users [though judging by his reputation, that shouldn’t happen in the first place]. Henceforth, the third option is our best bet.
How to Create and Use a Custom Fingerprint/Build.Prop to Pass Play Integrity
There exist a couple of methods of getting this job done- the automatic and the manual way. In the automatic method, you would still need to carry out the first step from the manual method, but it will then take care of the rest of the steps. Moreover, please take a backup beforehand, just to be on the safer side. Droidwin and its members wouldn’t be held responsible in case of a thermonuclear war, your alarm doesn’t wake you up, or if anything happens to your device and data by performing the below steps.
One Click Method [Easiest]
Well, we can’t thank chiteroman enough for this! He has just released a plug-and-play version of this module which would be the easiest and best method to opt for the generic users. All you need to do is get hold of this module v14.2 from GitHub, enable Zygisk, flash it via Magisk, and delete the data of Google Services Framework, Play Store, Play Service, and Play Protect Service [if present]. Here’s a detailed guide on the same, it’s highly recommended you check it out.
Automatic Method [Recommended]
- To begin with, get hold of the build.prop file from the desired ROM+firmware version as explained in the first step of the manual method below.
- Then download and extract Android SDK Platform Tools on your PC.
- Now download Pixel Flasher from GitHub and launch it [credits: XDA Recognized Developer badabing2003].
- Then click on Browse > navigate to the platform-tools folder and select it.
- Now click on Scan and select your device from the list. Then click Magisk.
![Fingerprint Build.Prop Play Integrity]()
- Click on the Process build.prop to navigate and select the donor build.prop file.
- It will output a JSON file, copy the contents, and fill in the missing data [if any].
- Click on the Edit pif.json button to edit the file on your phone, and paste what you got from the above step.
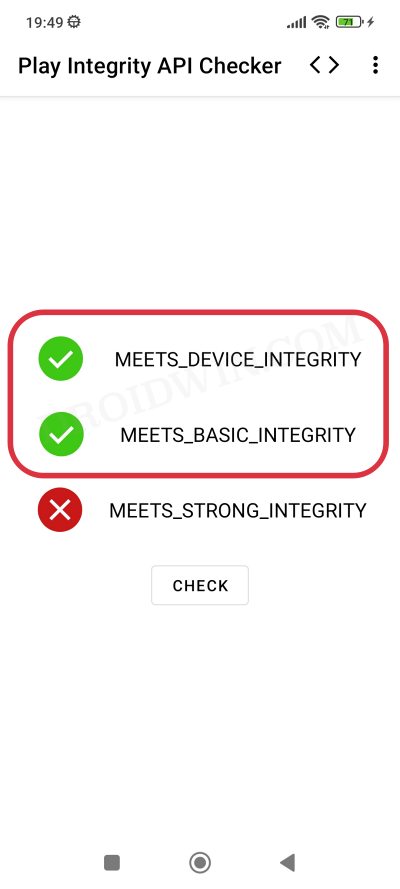
- Now download and install Play Integrity API Checker from the Play Store.
![Fingerprint Build.Prop Play Integrity]()
- Then select the same app from the tool and click on the Play Integrity Check button.
- It will bring up the results. Check if your device is passing this test [you only need to pass the first two tests].
- If it’s not, then use a different build.prop and retry the steps until you pass the Play Integrity test [there’s no other way out].
Manual Method [Difficult]
XDA Senior Recognized Developer Osmosis took this responsibility on his shoulders and has done quite an excellent job in listing out the steps on how you could create and use a custom.pif.json. Here are the instructions steps for the same:
First and foremost, download the stock ROM for a random device [see below], extract it, and get the system build.prop *and/or* product build.prop *and* vendor build.prop files from it. We or XDA cannot share these files publicly because Google will get hold of them and mass ban all of them at once [it has just happened with an Asus device. We managed to get an unpatched fingerprint from one of the Asus devices and used it to pass the Play Integrity Test. This worked for a few days before being ultimately patched by Google!].
- Regarding “a random device” that we mentioned above, make sure to keep the following points in mind before you download its ROM:
- All older Nexus devices (Nexus 6/shamu and older) appear to be banned.
- Final release ROM builds of all no-longer-supported remaining Nexus and Pixel devices are banned.
- The device must have at least been upgraded to Oreo (Android 8) and should have come with at least an Android 6 or higher version out of the box.
- Devices launching with Pie (Android 9) or later might not work.
- In a nutshell, try to pick a combination of a device and its ROM which you don’t think many people will choose. This is because “The less obvious statistical data Google receives indicating a particular fingerprint is being abused, the fewer fingerprints will get banned”.
Let’s now talk about the location of build.prop, product, and vendor.prop. In case of build.prop, it could be found at /system/system/build.prop or /system/build.prop. The product can be /product/build.prop and/or /product/etc/build.prop. The vendor is located in /vendor/build.prop or/system/vendor/build.prop.
In general, they’ll be ro.build.fingerprint + ro.product.* (older system build.prop), or, ro.system.build.fingerprint + ro.product.system.* (newer system build.prop) [or, ro.product.build.fingerprint + ro.product.product.* (product build.prop, only needed on devices where system build.prop contains “generic” values)].
From there, you’ll have to copy the following six values: PRODUCT (ro.*.name), DEVICE (ro.*.device), MANUFACTURER (ro.*.manufacturer), BRAND (ro.*.brand), MODEL (ro.*.model), and FINGERPRINT (ro.*.fingerprint). Optionally, also copy SECURITY_PATCH (ro.build.version.security_patch from system build.prop)
Now paste the copied values between the quotes of the corresponding fields in the template custom.pif.json sample shown below [it’s just a sample one that has already been banned by Google. So make sure to replace the values accordingly].
{
"PRODUCT": "taimen",
"DEVICE": "taimen",
"MANUFACTURER": "Google",
"BRAND": "google",
"MODEL": "Pixel 2 XL",
"FINGERPRINT": "google/taimen/taimen:8.1.0/OPM4.171019.021.R1/4833808:user/release-keys",
"SECURITY_PATCH": "2018-07-05",
"FIRST_API_LEVEL": "26"
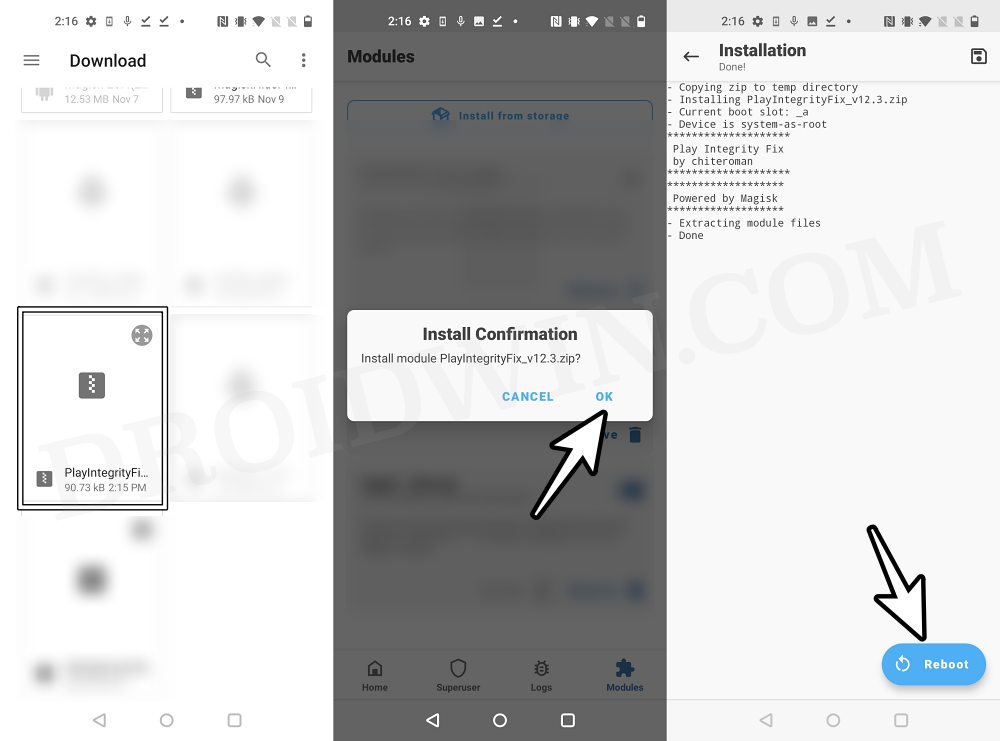
}Finally, copy your .json file to /data/adb/modules/playintegrityfix/custom.pif.json and then flash this module via Magisk [which is a fork for the original Play Integrity Fix module]. Or transfer it to the /data/adb/pif.json, flash the original Play Integrity Fix Module, and restart your device. Your device should now “hopefully” pass the Play Integrity Test using this custom fingerprint/build.prop! If it doesn’t, then you’ll have to pick a different fingerprint and retry this process.
Rooting and Custom ROMs: A Difficult Yet Achievable Journey Ahead!
So this was all from this guide on how to use a custom fingerprint/build.prop and pass the Play Integrity Test. While we always believed in the “sharing is caring” motto, however, for once, let’s not adopt it in this case scenario. If you get hold of a working fingerprint and then end up sharing that with the rest of the users, then it will ultimately be patched by Google. So keep that unique build.prop with yourself and prevent it from getting caught by Google!
NOTE: Some or the other changes are being constantly implemented by Google at an alarming rate. Thankfully, the developers are always one step ahead and are testing out new ways of bypassing the patches enforced by the Silicon Valley giant. But this also means that you will witness changes to the modules at frequent intervals as well, so we will update this guide as and when that happens. Make sure to keep a tab on this post regularly.
The post Use Custom Fingerprint/Build.Prop to Pass Play Integrity Test appeared first on DroidWin.